身先士卒,在命令之前按按下,在命令结束之后弹起
作为最常用的按钮,按钮也可以做出各种不同的变化。事实上TAPython的最初原型就是一个按钮和一个输入框。能够执行一行代码,我们就能肆意生长。
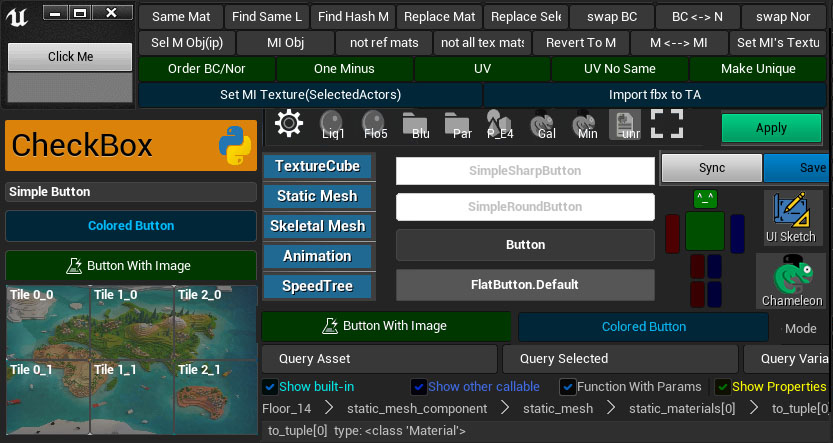
颜色
在Color of SButton 中我们有介绍SButton按钮相关颜色字段的使用,包括:
- ButtonColorAndOpacity
- ColorAndOpacity
- ForegroundColor
Font
TextSytle
SButton中的"Text"字段可以指定按钮的上的文本,"TextStyle"字段这用于指定文本吧的样式。
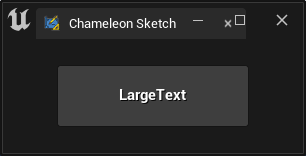
"SButton":
{
    "ContentPadding": [50, 20],
    "Text": "LargeText",
    "TextStyle": {
        "Style": "FEditorStyle",
        "StyleName": "LargeText"
    }
}
文字对齐
等按钮的尺寸是以相邻或者父控件的尺寸来显示的,比如 "VAlign": "Fill"
当使用"Text"字段对SButton设置显示文字的时候,文字是居中排列的。如果使用的是"Content"字段配合"STextBlock"使用。则可以使用"HAlign"和"VAlign"进行调整。
"SButton": {
    "Text": "PlaceHolder Button",
    "HAlign": "Center",
    "VAlign": "Center"
}
TIP
如果按钮中有"Content"字段其其中有内容,则优先显示"Content"中的内容,而不是"Text"中的内容。
其他可用的"TextStyle" 可见style-of-stextblock
OnClick
我们知道,在SButton的 "OnClick"字段中的内容在按钮点击时会被执行。之前的例子最小范例等,已经有过多次介绍。
控件路径占位符
这里需要提的一点是,在OnClick中也有一个变量占位符:*%widgetPath*。运行时,这个变量会被替换为当前点击的按钮的Widget路径。
例如:Chameleon Gallery中的"SnapShot"按钮的路径就是/SBorder/Content/SScrollBox/Slots_0/SGridPanel/Slots_127/SHorizontalBox/Slots_1/SButton
这个路径,也可以在PyCharm的看到

有了这个Widget路径,当我们在一个界面中多次使用同一个External Json文件时,我们可以通过这个变量来判断是哪个按钮被点击了。
Add %widgetPath keyword in JSON
Content
既然"Content"中允许我们将子控件作为按钮的显示内容,那么我们当然可以用SImage, SRichTextBlock等控件丰富我们的按钮。
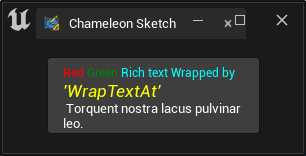
"SButton":
{
    "Text": "LargeText",
    "TextStyle": {
        "Style": "FEditorStyle",
        "StyleName": "LargeText"
    },
    "Content": {
        "SRichTextBlock": {
            "Text": "<RichText.red>Red</> <RichText.green>Green</> <RichText.cyan>Rich text Wrapped by</><TextStyle FontFamily=\"Roboto\" FontSize=\"13\" FontStyle=\"Italic\" FontColor=\"(R=1, G=1,B=0,A=1)\">  'WrapTextAt'</>\n Torquent nostra lacus pulvinar leo.",
            "AutoWrapText": true,
            "Justification": "Left",
            "WrapTextAt": 200,
            "WrappingPolicy": "AllowPerCharacterWrapping",
            "Marshaller": "ChameleonRichText"
        }
    }
}
Extra
事实上我们可以在按钮中放入任何控件,比如SHorizontalBox,甚至是一个SWebBrowser显示一个网页页面。
下面介绍几个常用的应用
组合按钮
在Content中方式多个控件,可以丰富按钮的显示内容。例如下面的例子,在按钮中同时显示图标和文字。
由于Content中只能有一个控件,所以我们需要使用SHorizontalBox来包裹多个控件。用于显示图标的SImage和用于显示文字的STextBlock是SHorizontalBox的子控件。
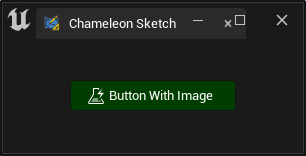
"SButton":
{
    "HAlign": "Center",
    "ContentPadding": 6,
    "ButtonColorAndOpacity": [0, 1, 0, 1],
    "ForegroundColor": [1, 1, 1, 1],
    "ToolTipText": "This is a button with image and Text",
    "OnClick": "print('Button clicked.')",
    "Content": {
        "SHorizontalBox": {
            "Slots": [
                {
                    "AutoWidth": true,
                    "SImage": {
                        "Image": {
                            "Style": "FEditorStyle",
                            "Brush": "AutomationTools.TestAutomation"
                        }
                    }
                },
                {
                    "Padding": [5, 0],
                    "STextBlock": {
                        "Text": "Button With Image"
                    }
                }
            ]
        }
    }
}
上面代码中的SImage使用了EditorStyle中的一个名为AutomationTools.TestAutomation图标。更多关于EditorStyle的相关的内容可以参考 Editor Style Gallery;关于SImage的内可以可以参考 Use Images and Image Brush和 Image and Render Target。
共用背景
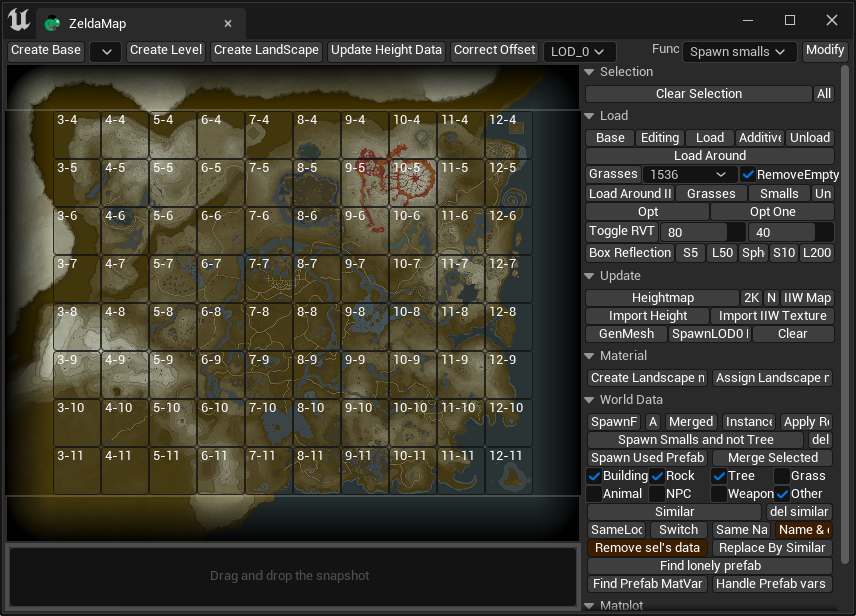
有多个按钮需要共用一个背景的时候,例如下图的一个地图编辑器中,用于地块操作的按钮都共用同一个背景。
这个时候我们可以使用SOverlay,将背景和按钮组叠加放在一起。具体的介绍和示例JSON代码可见Canvas Layout
"SBox": {
    "HeightOverride": 480,
    "WidthOverride": 576,
    "Content": {
        "SOverlay": {
            "Slots": [
                {
                    "SImage": {
                        "Aka": "AImage",
                        "ImagePath": "Images/zelda_game_map.png"
                    }
                },
                {
                    "SVerticalBox": {
                        "Slots": [
                            {
                                "autoHeight": true,
                                "SBox": {
                                    "HeightOverride": 48,
                                    "Content": {
                                        "SBorder": {
                                        }
                                    }
                                }
                            },
                            {
                                "autoHeight": true,
                                "SBox": {
                                    "HeightOverride": 384,
                                    "Content": {
                                        "SHorizontalBox": {
                                            "Slots": [
                                                {
                                                    "autoWidth": true,
                                                    "SBox": {
                                                        "WidthOverride": 48
                                                    }
                                                },
                                                {
                                                    "autoWidth": true,
                                                    "SBox": {
                                                        "WidthOverride": 480,
                                                        "Content": {
                                                            "ExternalJson": "ZeldaWorldMapEditor_Buttons.json"
                                                        }
                                                    }
                                                }
                                            ]
                                        }
                                    }
                                }
                            },
                            ...
                        ]
                    }
                }
            ]
        }
    }
}
例如,上面的代码中用
"SOverlay"将背景图片和按钮组叠加在一起,按钮组中的具体内容在"ZeldaWorldMapEditor_Buttons.json"中,通过"ExternalJson"引入。"SBox"用于占位,在现在的TAPython版本中,更合适的做法是使用SCanvas将整个放置按钮组的"SBox"整体平移到[48, 48]。具体在Canvas Layout中有介绍,可供参考
TIP
当我们的界面内容过于机械和重复的时候,我们也可以用Python脚本生成界面JSON,或者其中的模型部分
重叠控件
不同的控件可以重叠在一起,例如SEditableTextBox和SDropTarget,例如下面的例子中,一个按钮和一个进度条重叠在一起。
在Shelf Tools中,将"SButton" 和"SEditableText"放在一起,使得控件能够有可编辑的文本和按钮,用户在不同的阶段,点击同样的位置,可以触发不同的操作(触发按钮,或者进入SEditableText的编辑状态)。
    "SOverlay": {
    "Slots": [{
            "SButton": {"ButtonStyle": {"Style": "FEditorStyle", "StyleName": "HoverHintOnly"}, "ContentPadding": [16, 0],
                "OnClick": "chameleon_shelf.on_button_click(id=0)",
                "Content": { "SImage": {"Aka": "Img_0", "ImagePathInPlugin": "Resources/PythonGreyIcon_40x.png", "ColorAndOpacity": [1,1,1,0.6]}}
            }
        },{
            "Padding": [0, 20, 0, 0],
            "SEditableText":{"Aka": "Txt_0", "Text": "", "ColorAndOpacity": [1,1,1,1], "Justification": "Right"}
        }
    ]
}