Row by Row, Column by Column
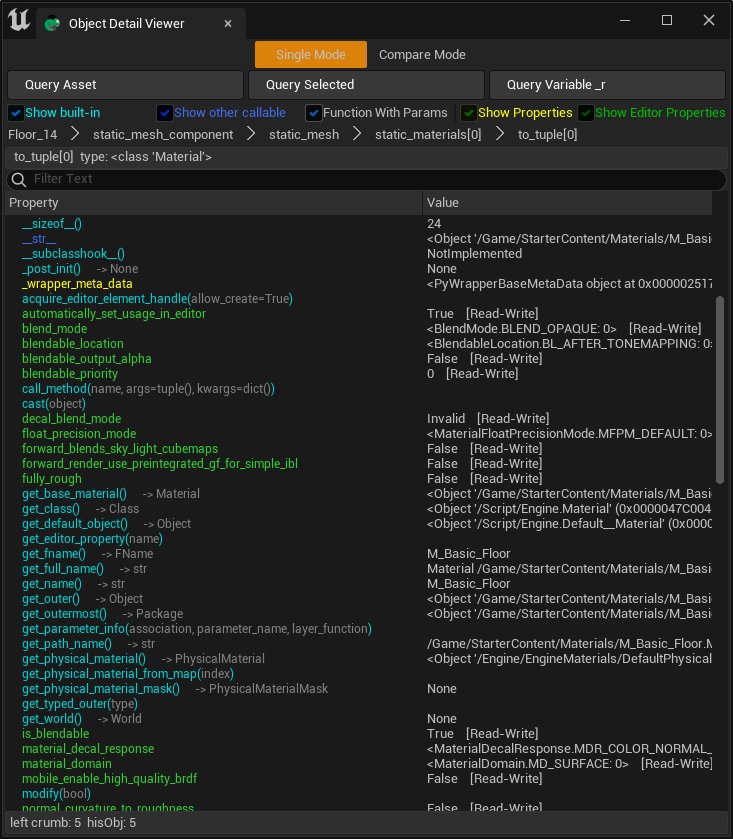
SListView is a widget used to display lists and tables. It can display multiple columns with complex content, such as in the built-in ObjectDetailViewer. Object Detail Viewer
Setting Content
There are two types of SListView in TAPython: SListView and SListView"SListView<MultiColumn>".
Extra
Dividing SListView into these two types is the most significant failure in my TAPython design. In order to maintain compatibility with earlier code, SListView and SListView
ListItemsSource
"ListItemsSource" can be used to set the initial content of SListView. In the example below, we set the content of SListView to ["Item A", "Item B", "Item C"]。
"SListView": {
    "Aka": "MaterialList",
    "ListItemsSource": ["Item A", "Item B", "Item C"],
    "SHeaderRow": {
        "Columns": [
            {
                "DefaultLabel": "List Label",
                "FillWidth": 1
            }
        ]
    }
}
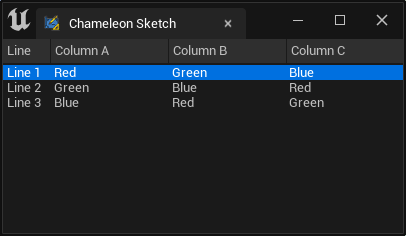
For multi-column SListView, the component name is "SListView<MultiColumn>". In the example below, we create a 3-row, 4-column SListView.
"SListView<MultiColumn>": {
    "SHeaderRow": {
        "Columns":
        [
            {
                "DefaultLabel": "Line",
                "FillWidth": 0.1
            },
            {
                "DefaultLabel": "Column A",
                "FillWidth": 0.25
            },
            {
                "DefaultLabel": "Column B",
                "FillWidth": 0.25
            },
            {
                "DefaultLabel": "Column C",
                "FillWidth": 0.25
            }
        ]
    },
    "ListItemsSource": [
        ["Line 1", "Red", "Green", "Blue"],
        ["Line 2", "Green", "Blue","Red"],
        ["Line 3", "Blue", "Red", "Green"]
    ],
    "OnSelectionChanged": "print(%Index)",
    "OnMouseButtonDoubleClick": "print('double click: {}'.format(%Index))"
}
SHeaderRow
"Columns" is used to set the names of each column in the SListView header. Each element in "Columns" corresponds to a column in SListView. "DefaultLabel" is the column title, and "FillWidth" is the column width. The value of "FillWidth" is a relative value, with the actual proportion being the ratio of its value to the sum of all "FillWidth" values.
CAUTION
SListView widget must include SHeaderRow widget, otherwise it will not work properly.
Manipulating SListView with Python Code
Setting Content
To set the content for a single-column SListView, use the "set_list_view_items" method.
chameleon_data_instance.set_list_view_items(aka_name, ["Item A", "Item B", "Item C"])
To set the content for a specific column in a multi-column SListView, use the "set_list_view_multi_column_items" method.
chameleon_data_instance.set_list_view_multi_column_items(aka_name, ["Line A", "Line B", "Line C"], column_index)
Setting Selection State
To set a specific row in SListView as selected, use the "set_list_view_selection" method.
chameleon_data_instance.set_list_view_selections(aka_name, selection_index_list)
For multi-column SListView, use the "set_list_view_multi_column_selection" method to set the selected rows.
chameleon_data_instance.set_list_view_multi_column_selections(aka_name, selection_index_list)
Retrieving Content
To retrieve the content of SListView, use the "get_list_view_items" method. This method returns both the content and selection
items, isSelected = chameleon_data_instance.get_list_view_items(aka_name)
To retrieve the content of a multi-column SListView, use the "get_list_view_multi_column_items" method. This method returns all items and the number of columns in SListView. The returned items are a one-dimensional array, with columns having priority. First, all rows of the first column are returned, followed by all rows of the second column, and so on. The content of the header is not included.
NOTE
Since the C++ side cannot directly return a two-dimensional array to Python, we can convert the returned items and the number of columns into a two-dimensional array ourselves.
items_list, num_column = chameleon_data_instance.get_list_view_multi_column_items(aka_name)
To retrieve the selection state of SListView, use the "get_list_view_selection" method. This method returns an array of indexes of the currently selected rows in SListView.
selection_indexes = self.data.get_list_view_multi_column_selection(aka_name)
Event Callback
OnSelectionChanged
"OnSelectionChanged" can be used to set the callback function when the selected row in SListView changes. The variable placeholder "%Index" can be used to get the index of the selected row.
"OnSelectionChanged": "print(%Index)",
"OnMouseButtonDoubleClick": "print('double click: {}'.format(%Index))"
Variable Placeholders
-
"%Index"When a click or double-click event is triggered,"%Index"will be replaced with the index of the currently selected row. -
"%Item"
CAUTION
The "%Item" placeholder is only supported for SListView, not for SListView
OnMouseButtonDoubleClick
Similar to "OnSelectionChanged", "OnMouseButtonDoubleClick" can be used to set the callback function when a row in SListView is double-clicked. The variable placeholder "%Index" can be used to get the index of the selected row.
OnContextMenuOpening
In addition to the two event callbacks mentioned above, SListView also supports the "OnContextMenuOpening" event callback. This event callback is triggered when the SListView is right-clicked, and is used to open a custom context menu.
"OnContextMenuOpening": {
    "items": [
        {
            "name": "Save to json",
            "Command": "chp_objectManager.save_current_prefab_to_json()"
        },
        {
            "name": "Load from json",
            "Command": "chp_objectManager.set_current_prefab_from_json()"
        },
            {
            "name": "Generate Mesh",
            "Command": "chp_objectManager.generate_mesh_for_this_prefab()"
        }
    ]
},
Several other widgets also support "Context Menu". For more details on "Context Menu", please refer to this link:Context Menu for Slate
RichText
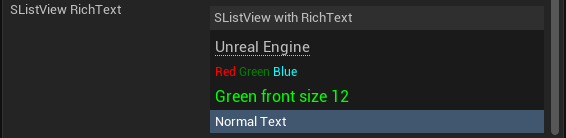
To enable rich text in SListView, we need to add a field named "RichText" and set it to true, as shown below:
For more details on using rich text in SListView, please refer to this link: RichText