TA Python Tools
This is a plugin which tries hard to make Unreal Editor Tools As Easy As Possible.
Extended Python Editor interfaces

Overview
TAPython is an editor plugin for Unreal Engine. It provides a framework for creating python editor tools in Unreal Engine, and live Slate editing for developers, which makes creating menus and UE native Slate UI much easier and faster(without any compiling time or restart editor). The plugin also provides 200+ editor tool interfaces to use, making developing UE editor tools very simple and efficient.
New documentations for TAPython is here: TAPython Documentation
Feature
- Use UE4 native Python
- Create UE Slate UI dynamically, support 44+ Slate widgets.
- Configurable main menu/toolbar/Content Browser menu.
- Slate like syntax interface description file, real-time preview UI result, without any reload.
- Bind Python command to Slate UI widget, and change the UI content with python.
- No engine source code modified, compatible with lower versions of UE4(4.26, 4.27) and latest UE5
- 200+ Extra Editor Command for Python and Blutility.
How to Install
Prerequisites
This plugin use UE native Python Script Plugin. The doc Scripting the Editor using Python is also very useful.

Steps
1.Download from TAPython release repo @github and unzip the plugin to <Your_UE_Project>\Plugins
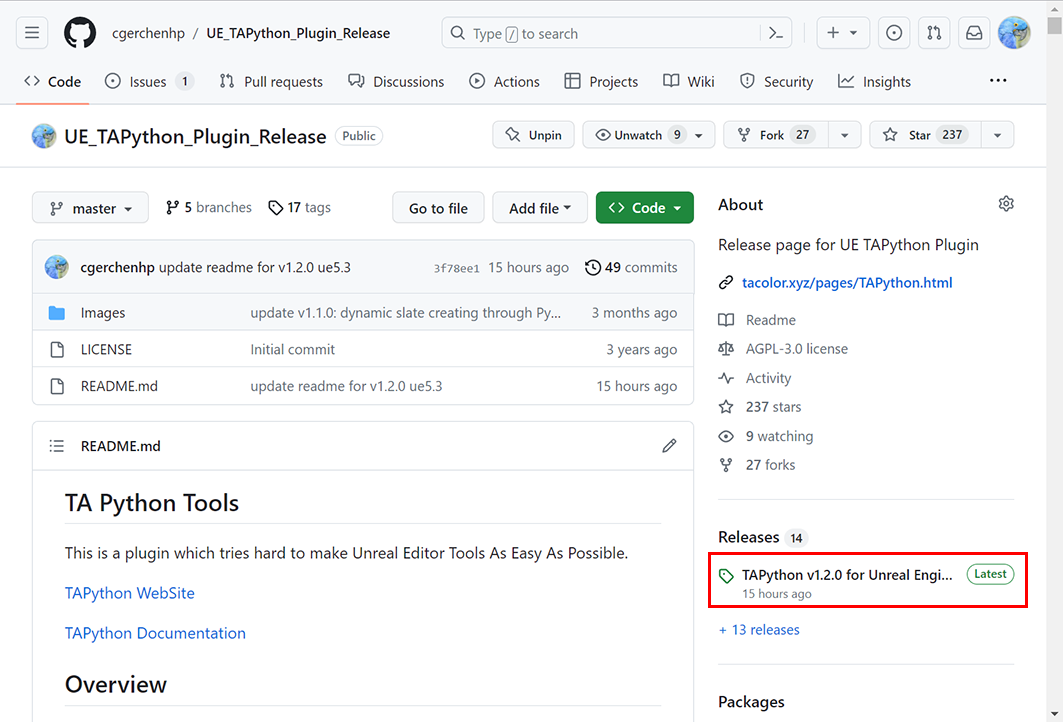
The latest version:
The "Source Code" on image above is NOT Source Code, it's the Readme.md and images. Which is same as this page.
https://github.com/cgerchenhp/UE_TAPython_Plugin_Release/releases/tag/v1.0.1-ue5
    Your_UE_Project
    ├── Content
    ├── ...
    └── Plugins
        └── TAPython       # <--- Put Plugin Here
            ├── Binaries
            ├── Config
            └── Content
            └─ ...
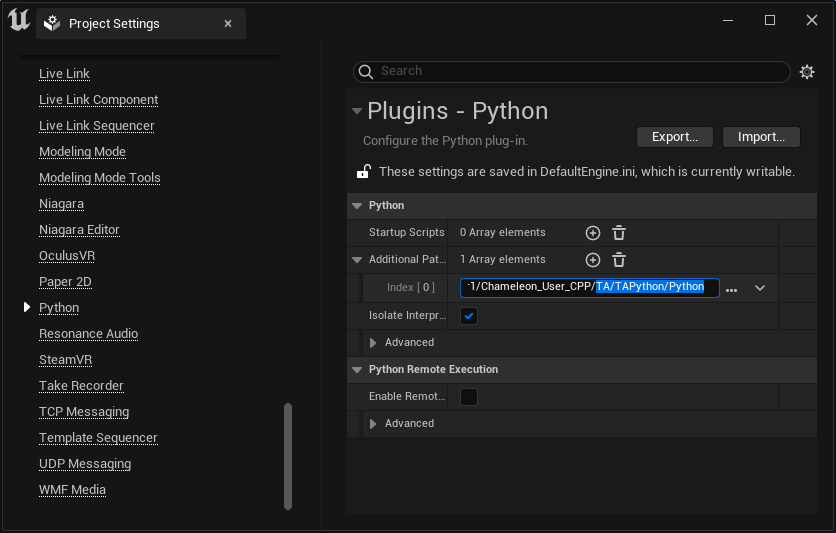
2.Laungch project, open Project settings - Plugin Python - additional path, add <Your_UE_Project>/TA/TAPython/Python to additional path. then restart the editor.
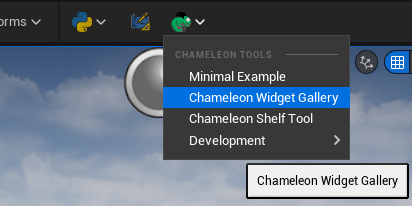
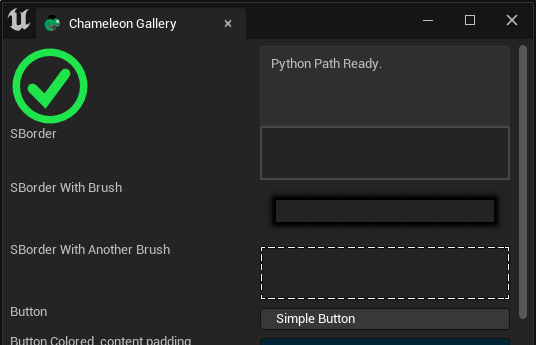
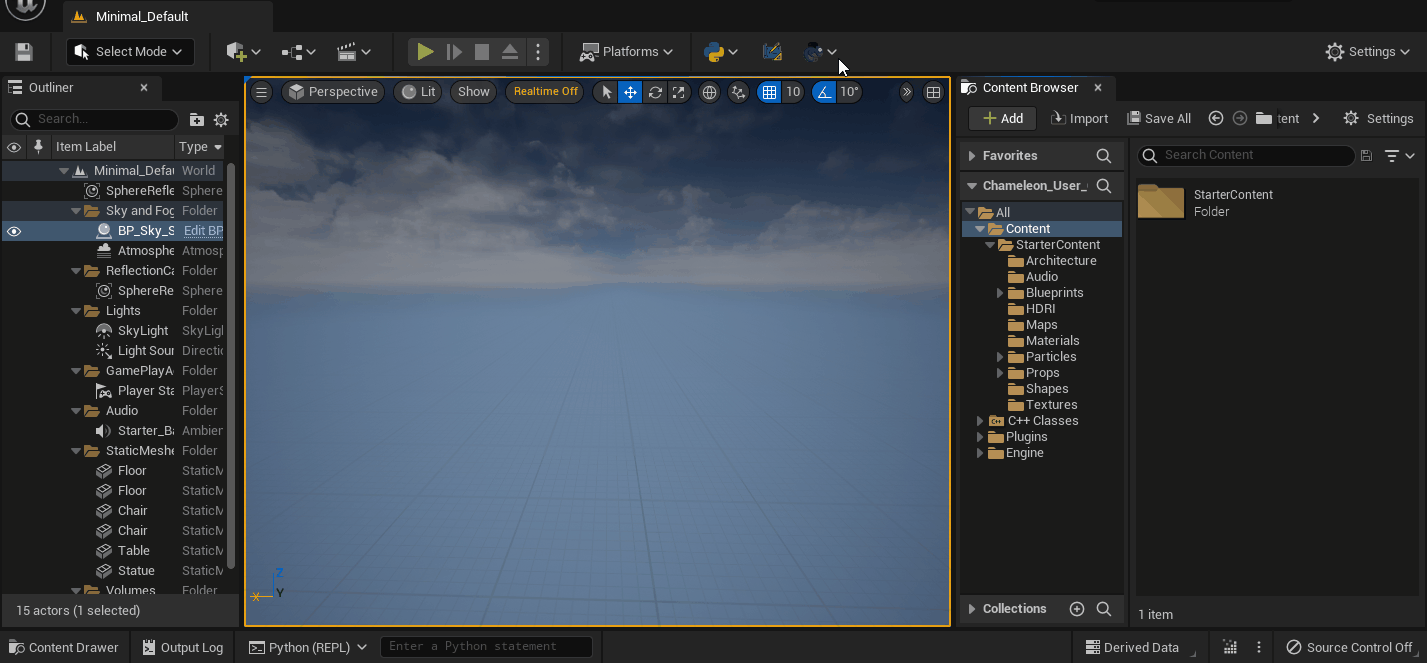
3.click the Gallery icon on main toolbar, you should see a green check box UI like below.
Green sign and text "Python Path Ready" will showing at the top of gallery.
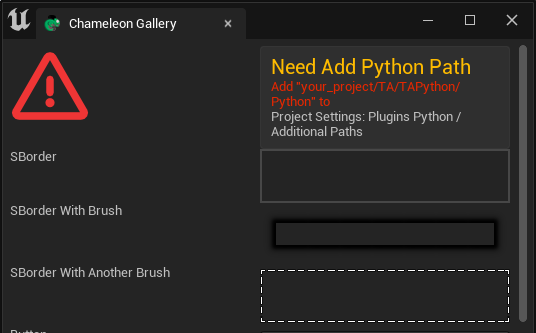
If a Red Cross is displayed, check the Project Setting above.
Quick Start
The plug-in package contains several menu items and four demo tools by default.
The latest DefaultResources is here: DefaultResources@github
Menu Items
- Context Menu Items in Content Browser
- Context Menu Items for selected asset
- Menu Item in Main menu
- Menu icons on Mainbar
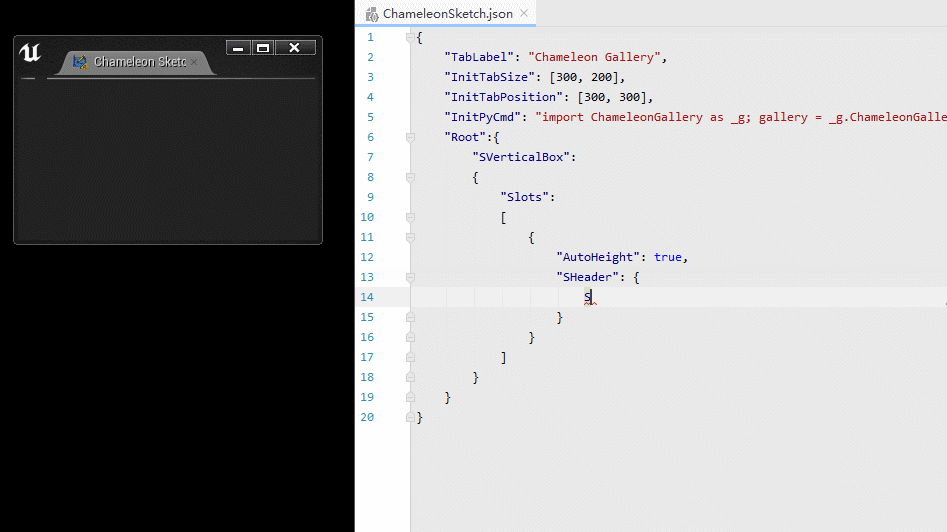
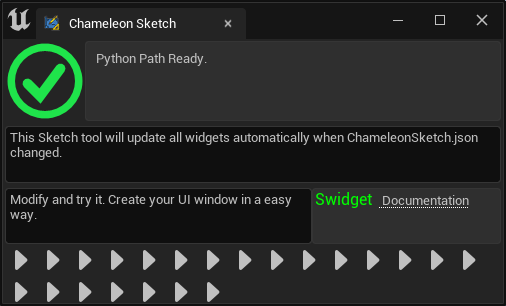
Sketch Tool for design/tweaking UI
![]()
The Sketch Tool is a special ui design tool. When the<Your_UE_Project>\TA\TAPython\Python\ChameleonSketch\ChameleonSketch.json file is modified, the content of the ui will be updated immediately(see below gif). This can be very useful when writing tool interfaces, and will save a lot of time when tweaking the interface layout or parameters.
The default sketch tool looks like below. Try to modify the content of ChameleonSketch.json with any text editor, and save it. Don't worry about the json keywords and syntax, it's easy to learn and has lots of examples, will be described below.
Example Tools
All the 4 Example tools, are written with python, without any single line of c++ code.
Tool 1: MinimalExample
This is a tool demonstrating the creation of a standard UE Slate UI with python and a json file. The Button calls Python code, then the python code sends the results(click count) back to the UI.
The tool includes a 30-lines Json file and a 15-lines Python file. In fact, it can be shorter.
I will call this kind of tool which creates Slate interfaces in this way "Chameleon Tools"
MinimalExample.json:
    {
        "TabLabel": "Example",
        "InitTabSize": [200, 123],
        "InitTabPosition": [680, 150],
        "InitPyCmd": "import Example; chameleon_example = Example.MinimalExample.MinimalExample(%JsonPath)",
        "Root":
        {
            "SVerticalBox":
            {
                "Slots": [
                    {
                        "SButton": {
                            "Text": "Click Me",
                            "HAlign": "Center",
                            "VAlign": "Center",
                            "OnClick": "chameleon_example.on_button_click()"
                        }
                    },
                    {
                        "SEditableTextBox":
                        {
                            "IsReadOnly": true,
                            "Aka": "InfoOutput",
                            "Text": ""
                        }
                    }
                ]
            }
        }
    }
MinimalExample.py
    # -*- coding: utf-8 -*-
    import unreal
    from Utilities.Utils import Singleton


    class MinimalExample(metaclass=Singleton):
        def __init__(self, jsonPath:str):
            self.jsonPath = jsonPath
            self.data = unreal.PythonBPLib.get_chameleon_data(self.jsonPath)
            self.ui_output = "InfoOutput"
            self.clickCount = 0

        def on_button_click(self):
            self.clickCount += 1
            self.data.set_text(self.ui_output, "Clicked {} time(s)".format(self.clickCount))
Tools 2 Shelf
Shelf is a Maya-like shortcut shelf tool, showing how to set visibility of widget and the usage of SDropTarget widget.
Users can drag and drop items to the shelf, and execute custom Python Code, launch Chameleon tool when clicking the item on the shelf.
| Type | Action |
|---|---|
| assets | select saved assets in content Brower |
| folder | enter saved folder in Content Brower |
| actors | select saved actors in level |
| text(python snippet) | execute as python code |
| chamelon tool json file | launch the Chameleon tool |
You can modify the python code, and make it better.
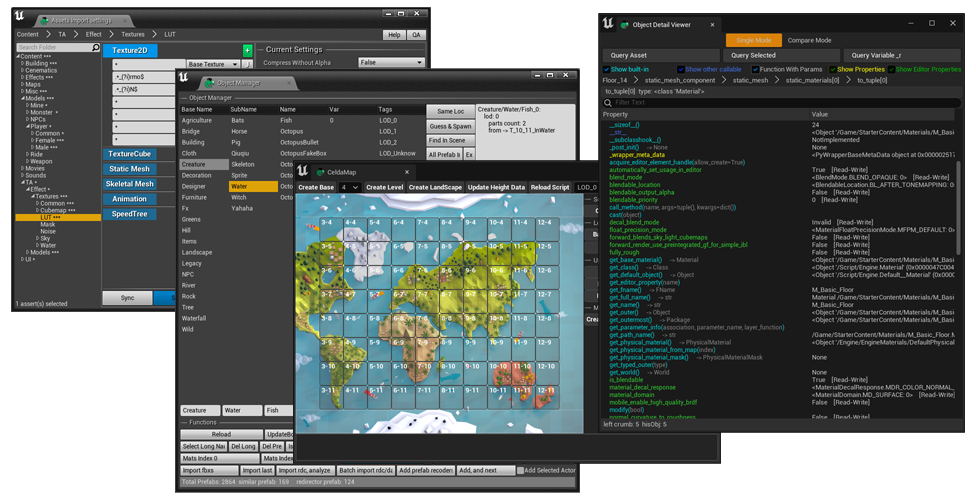
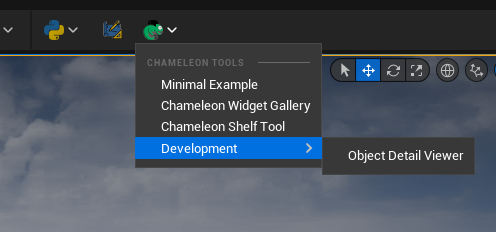
Tool 2 Object Detail Viewer
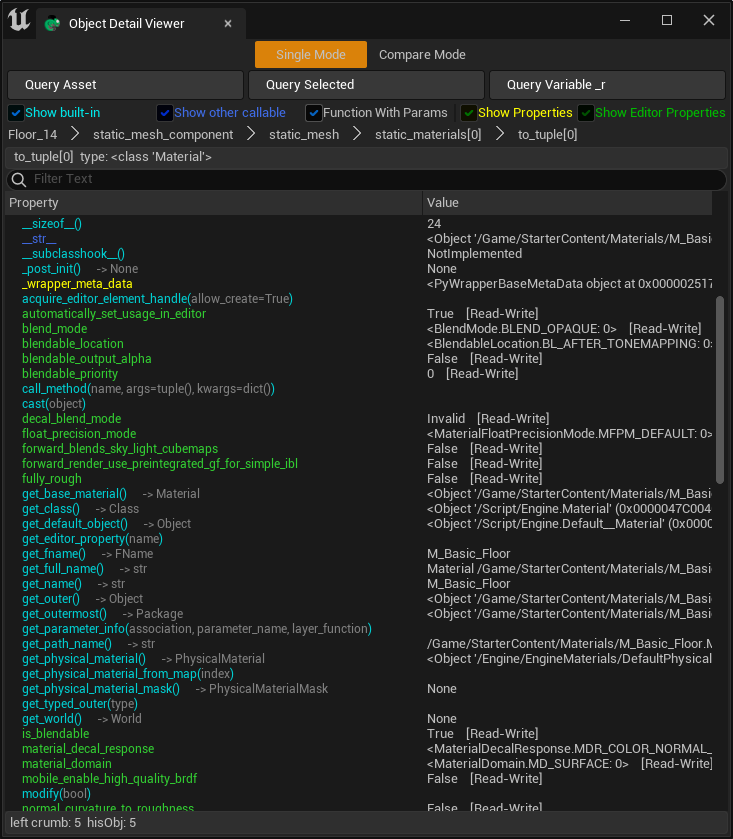
Object Detail Viewer is an inspector Tool for UE object. It shows all the functions and property in any UObject. Double click the property will query the child property. The image above shows the detail values of Floor_14(actor).static_mesh_component.static_mesh.static_materials[0].
In compare mode, the differences of two UObjects will be highlighted. It's very useful for being familiar with all kinds of UObject.
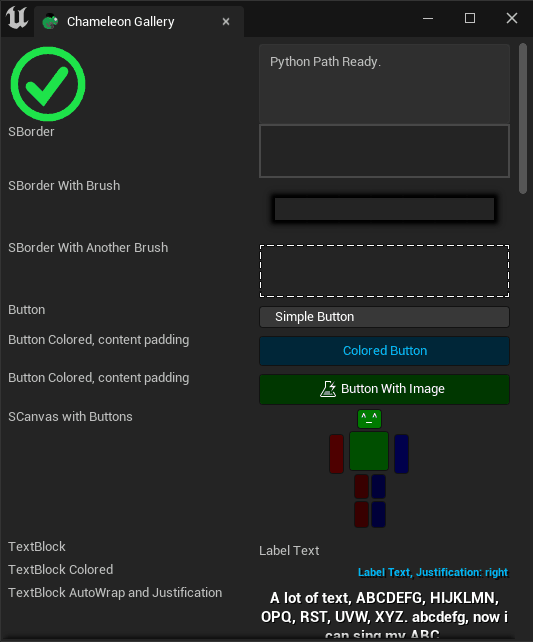
Tool 3 Chameleon Gallery
Chameleon Gallery shows the most common widgets, and how to describe them in a json file. All the supported widgets and API documents can be found here
Documentation
Entry
All the menu items and the chameleon tools entry is the MenuConfig.json in <Your_UE_Project>\TA\TAPython\UI\ folder.
Add Menu Item
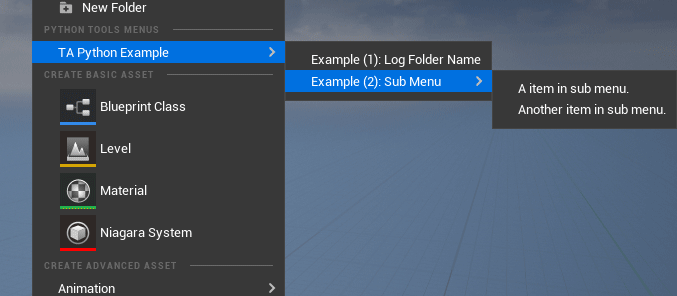
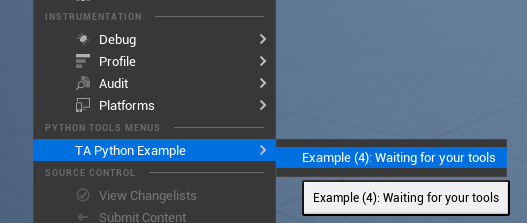
This code snippet shows how to add a menu item to the main menu. Python code: "print('Hello world')" will be executed when click it.
"OnMainMenu":
{
    "name": "Python Menu On Main Menu",
    "items":
    [
        {
            "name": "TA Python Example",
            "items": [
                {
                    "name": "Example (4): Waiting for your tools",
                    "command": "print('Hello world')"
                }
            ]
        }
    ]
},
Keywords in MenuConfig.json:
"OnSelectFolderMenu": Menu Items when right-click a foler or r-click in emtpy space in content browser.
"OnSelectAssetsMenu": Menu Items when right-click assets in content browser
"OnMainMenu": Menu items in main menu.
"OnToolbar": Menu item's entry icon in mainbar, the icons is a python logo. We use it for python tools which has no UI.
"OnToolBarChameleon": Chameleon tool's icon in mainbar, the icons is a green chameleon logo. We use it for Chameleon tools.
"items": Type: Array, contain all the menu item, also support sub-array for a menu-tree.
"name": The display name in menu item.
"command": python code, which will be executed when clicked.
"ChameleonTools" The relative-path of Chameleon Tool, which will be launched when clicked.
"ChameleonTools": "../Python/Example/MinimalExample.json"
"enabled": whether enable the item or not. The item will not be hide when set to 'false'.
"canExecuteAction": Python Code,whether the menu item can be executed. The item will grey out when the python code return false.
"tooltip": Tool tip when cursor on menu
Create Chameleon Tools
This is the main feature of this plugin. This feature allows users to create UE4 editor UI(UE Slate) from a UI description files (.json). Binding the Python code to UI widgets,also provides APIs for modifying the interface for achieving two-way data communication. No compile or restart needed in development.
Supported Widgets
41 Supported Slates are supported and are being added continuously.
Howt to convert C++ Slate code to Json Slate
-
Remove "SNew" using Slate type name instead.
-
Using "Aka" instead of "SAssignNew". SAssignNew(ButtonPicture, SImage) will be "SImage":{"Aka": "ButtonPicture"}
-
Using Content":{ } instead of "[]" for assigning the only child in widget.
-
+SSomewidget::Slot will be "Slots" array: [{...}, {...} ...]. Each sub widget is a JsonObject Value in the array
-
GetBrush from a Style will be instead with "Style" and "Brush"
-
Vector2, Vector4 will be an array: [1,2,3,4]
For example:
The c++ Slate code:
SNew(SBorder)
.BorderImage(FEditorStyle::Get().GetBrush("ToolPanel.DarkGroupBorder"))
[
    SNew(SSpacer)
    .Size(FVector2D(100, 50))
]
equals json code:
"SBorder":{
    "BorderImage":
    {
        "Style": "FEditorStyle",
        "Brush": "ToolPanel.DarkGroupBorder"
    },
    "Content":
    {
        "SSpacer": { "Size": [100, 50] }
    }
}
Another example, c++ Slate code:
    SNew(SGridPanel)
        .FillColumn(0, 0.5f)
        .FillColumn(1, 0.5f)
        + SGridPanel::Slot(0, 0)
        [
            SNew(STextBlock)
            .Text(LOCTEXT("SBorderLabel", "SBorder"))

        ]
        + SGridPanel::Slot(1, 0)
        .Padding(0.0f, 4.0f)
        [
            SNew(SBorder)
            [
                SNew(SSpacer)
                .Size(FVector2D(100, 50))
            ]
        ]
equals:
    "SGridPanel":
    {
        "FillColumn": [[0,0.5],[1,0.5]],
        "Slots":
        [
            {
                "Column_Row": [0,0],
                "STextBlock": { "Text": "SBorder" }
            },
            {
               "Column_Row": [1,0],
               "SBorder":
                {
                   "Content":
                    {
                        "SSpacer": { "Size": [100, 50] }
                    }
                }
            }
        ]
    }
Also there are dozens of json widget example in Widget Gallery.
Communication between Slate widget and python
We use the MinimalExample for explaining how the Chamleon Tool works.
- The content in MenuConfig.json defined the menu item for launching the MinimalExample tool. In this example, it's "../Python/Example/MinimalExample.json"
     "OnToolBarChameleon": {
         "name": "Python Chameleon on toolbar",
         "items": [
             {
                 "name": "Minimal Example",
                 "ChameleonTools": "../Python/Example/MinimalExample.json"
             }
         ]
     }
- In MinimalExample.json, the content of "InitPyCmd" will be executed as python code, when the tool was launching. The "%JsonPath" will be replaced by acture path automatically and passed to python tool class: "MinimalExample". The variable: "chameleon_example" is in python global name space, using unique one in each Chameleon tool.
"InitPyCmd": "import Example; chameleon_example = Example.MinimalExample.MinimalExample(%JsonPath)",
- The base class of a Chameleon Tool is Singleton class in Utilities.Utils. The jsonPath been passed to the tool class in init function. In fact, the jsonPath is an id which is used to identify different chameleon tools. Also, the tool class will fetch the ChameleonData with it, and save it in local variable "self.data". "self.data" is the key communication channel between UI widget and python code.
    from Utilities.Utils import Singleton
    class MinimalExample(metaclass=Singleton):
        def __init__(self, jsonPath:str):
            self.jsonPath = jsonPath
            self.data = unreal.PythonBPLib.get_chameleon_data(self.jsonPath)
- The content of "OnClick" in json, will be executed as python code, and call the function: "on_button_click" which defined in python chameleon tool.
"OnClick": "chameleon_example.on_button_click()"
- "on_button_click" will record the click count, and send it back to the widget, though "self.data" which was mentioned in step 2
    def on_button_click(self):
        self.clickCount += 1
        self.data.set_text(self.ui_output, "Clicked {} time(s)".format(self.clickCount))
In above expample, we change the text through the function "self.data.set_text", and also can get/set other property of editor UI widges in similar ways. Other API are ChemeleonDataAPI
Extension API Library for Python
More than 100+ Blueprint callable function were added in this plugin, include but not limited to: Message Dialogs, Assets Editing, Editor Commands.
The full documentation is here
Shortcuts
- Modify the contnet of HotkeyConfig.json, assign Chameleon Tool in "ChameleonTools" or Python code in "command" filed.
../TA/TAPython/UI/HotkeyConfig.json
    {
        "Hotkeys":
        {
            "HotkeyA": {
                "ChameleonTools": "../Python/ChameleonGallery/ChameleonGallery.json"
            },
            "HotkeyB": {
                "command": "unreal.EditorLevelLibrary.set_selected_level_actors([actor for actor in unreal.EditorLevelLibrary.get_all_level_actors() if len(str(actor.get_name())) > 60])"
            },
            "HotkeyC": {
                "command": "print('Hotkey C')"
            },
            "HotkeyD": {
                "command": "print('Hotkey D')"
            },
            "HotkeyE": {
                "command": "print('Hotkey E')"
            }
        }
    }
- Assign the hotkey in Editor Setting - Keyboard Shortcuts
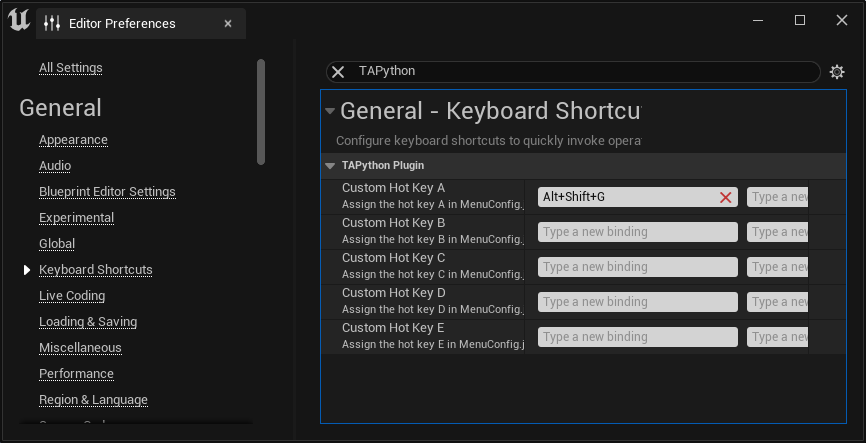
In this example, when press the hotkey: "Alt + Shift + G", will launch the "ChameleonGallery" tool
Configs
<Your_UE_Project>TA\TAPython\Config\config.ini
    [Settings]
    MenuConfigFilePath=/TA/TAPython/UI/MenuConfig.json
    ChameleonDataFolder=/Game/TA/ChameleonTools

    [Advanced]
    MainbarExtensionHookName=Game
    MainMenuExtensionHookName=WindowLayout
    MenusOnToolbarEnabled=True
    SketchToolsEnabled=True
| Name | Usage |
|---|---|
| MenuConfigFilePath | The main entry file for menu and chameleon tool |
| ChameleonDataFolder | Abandoned |
| MainbarExtensionHookName | The location where the main toolbar hooks |
| MainMenuExtensionHookName | The location where the main menu hooks |
| MenusOnToolbarEnabled | show menu entry on toolbar or not |
| SketchToolsEnabled | show Sketch tool or not |
<Your_UE_Project>\Plugins\TAPython\Config\Plugin_Config.ini
    [Advanced]
    CopyInitialResource=True
| Name | Usage |
|---|---|
| CopyInitialResource | whether copy default example resource to project or not |
When launching project, the plugin will copy Initial Resource from <Your_UE_Project>\Plugins\TAPython\Resources\DefaultPythonSource to <Your_UE_Project> if there is no "TA" folder in <Your_UE_Project>
We highly recommend leave this option True, and using the initial resource as a start, then modifying/adding your tools.
FAQ
Q0. Can UE4 use this plugin?
A: Yes, at the beginning this plugin was developed with UE 4.21. We have released this plugin for UE 4.26 and 4.27.
Q1. Get flowing warning message when open the project.
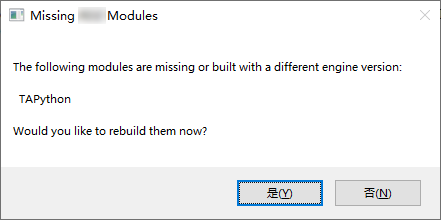
This is because the BuildID of the engine you are using is different from the BuildID which saved in the plugin.
We can modify the BuildId in plugin to get it work, in most case. (It will fail if your modify the UE engine a lot.)
1. Click No, when you get the warning message above.
2. Find out the BuildId of your engine. Open
    {
        "BuildId": "16433597",
        "Modules":
        {
            ...
        }
        ...
    }
- Open<Your_UE_Project>\Plugins\TAPython\Binaries\Win64\UnrealEditor.modules(UE4Editor.modules in UE4. Replace the BuildId value with the BuildId in step 2,save file.
    {
        "BuildId": "16433597",
        "Modules":
        {
            "TAPython": "UE4Editor-TAPython.dll"
        }
        ...
    }
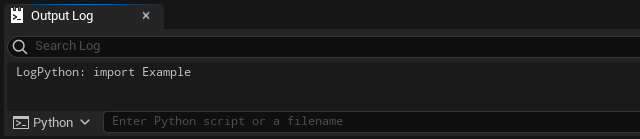
Q2. Menu item and tools not work
Make sure the Python path has been added to "additional python path" in project settings. Steps here
Check:
-
Launch Chameleon Gallery,green sign and text "Python Path Ready" will showing at the top of gallery.
-
Alternative, after import Example module in Python console, No any error message should be in console output.
Q3. Is this plugin include a python editor?
A: No. Pycharm Community and VS Code and other editors are very powerful, then can cover all the needs in daily development.
Q4. How can I debug
A: We can debug python and chameleon Tools with VSCode, detail steps here How To Debug Chameleon.
Q5. How can I get deail reference
Flowering page will be useful
- Documentation
- How To
- Tips Of Day
- Chameleon Gallery
- Chameleon Data API
- Supported Slates
- Extension Python Editor Lib
Contributing and feedback
This Plugin: TAPython is Free for use. The PythonDefaultResource is under MIT license.
- Any suggestions and comments are welcome. Please don't hesitate to leave your message.
- If you encounter difficulties or problems. EMail me with the problem description, screenshot and the log.
- If you find any English ambiguities or language errors on this page, please feel free to contact me as well.